Portfolio Planning


What is Jira?
Jira is a popular project management tool developed by Atlassian, widely used for issue tracking, project management, and agile software development. It provides a flexible platform that helps teams plan, track, and manage their work.
As Jira is an extremely flexible system we’ve deliberately designed Kiplot to minimise the Jira configuration required to integrate effectively with Kiplot. Kiplot currently supports Jira Cloud and Jira Data Center deployments.
Setting up your Jira Integration
Kiplot allows you to sync with multiple projects in Jira. To set up an integration with a new project:
- Go to Configuration > Integrations
- Click ‘Add Integration’ in the top right hand corner. A pop up screen will appear.

- Fill out the fields in all of the different tabs
- Deployment = Cloud or Data Center (select the relevant option)
- Integration name = Should be the same as the Project name in Jira
- Jira URL address = the Jira web address for the entire Jira space e.g. https://kiplot2.atlassiant.net
- Jira Username/ Email = this will be the credentials for the service account you created for Kiplot during Activation
- API token = to create an API token go to Jira → Account Management → Security → API token
- Project ID = To find this, go to the specific Projects detail page (Settings → Projects → click on the three dots to the right of the project → Project Settings). The Project ID is the number at the end of the URL after ‘pid=’
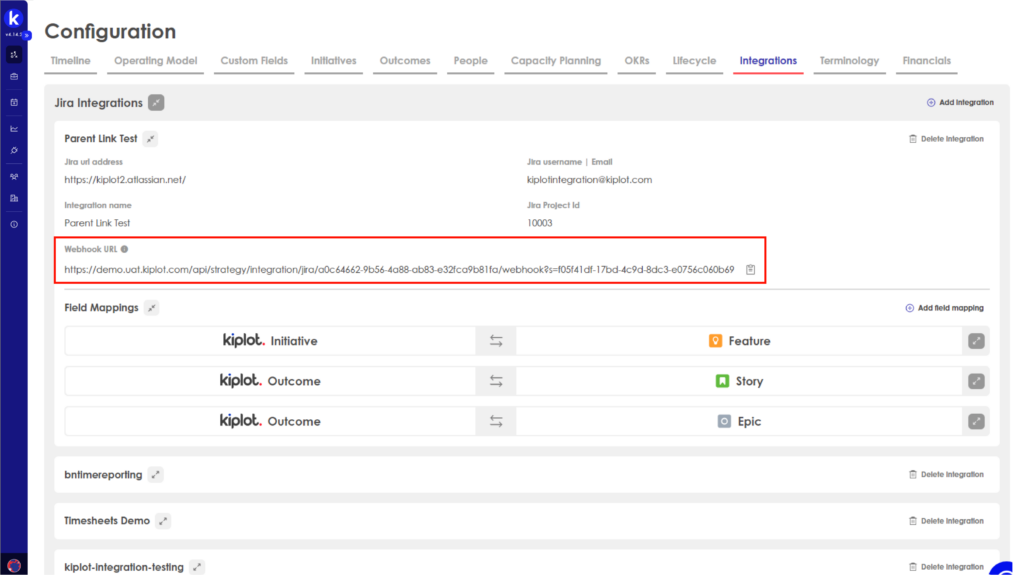
Clicking ‘integrate’ will confirm the integration and generate a Webhook URL which you’ll need later on. If there are any issues with the data you’ve provided an error message will pop up detailing the issue.
Webhooks
A webhook needs to be set up in Jira for each integrated Jira project. Webhooks enable real time configuration and ensure that data is always up to date in both systems. They can be set up to allow create, update and delete events.
When an update is made in Jira, the webhook message will ensure that the connected Kiplot item is updated according to the configured field mappings. Likewise, if a change is made in Kiplot, the connected issue in Jira is updated in real-time according to the configured field mappings.
To set up a webhook:
- Navigate to the System settings in Jira. Webhooks is usually at the bottom of the left hand navigation bar.
- Click ‘Create Webhook’
- Name the Webhook (Project Name)
- Copy in the Webhook URL from Kiplot (this can be found on the integrations page in the Configuration, against the specific project integration)
- Add in the following JQL for each integration:
- project = “Jira Project Name” AND issueType = initiative
- project = “Jira Project Name” AND issueType = outcome
- If my Project was called ‘Development’ and I was setting up an integration for initiatives I would use the JQL: project = “Development” AND issueType = initiative.
- If I also wanted to set up the integration to sycn with outcomes in the same Jira project, I would use the JQL: project = “Development” AND (issueType = initiative OR issueType = outcome)
- Check the created, updated & deleted boxes under ‘Issue’.

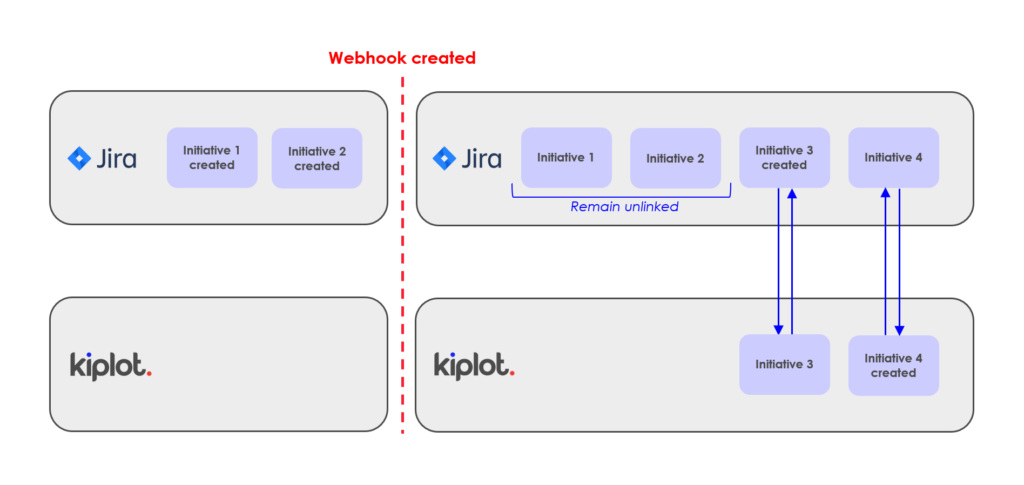
Once you have set up a webhook for your Jira project, it will sync with Kiplot from that date onwards. Any new initiatives or outcomes created in either platform in the integrated project will automatically be created in the other. Any changes to integrated fields will be reflected in both platforms too (see the section below for detailed information on field mappings).
Note that any initiatives or outcomes created prior to this date, won’t automatically appear in both platforms. It is possible to manually link these issues in Jira with initiatives and outcomes in Kiplot or bulk create.
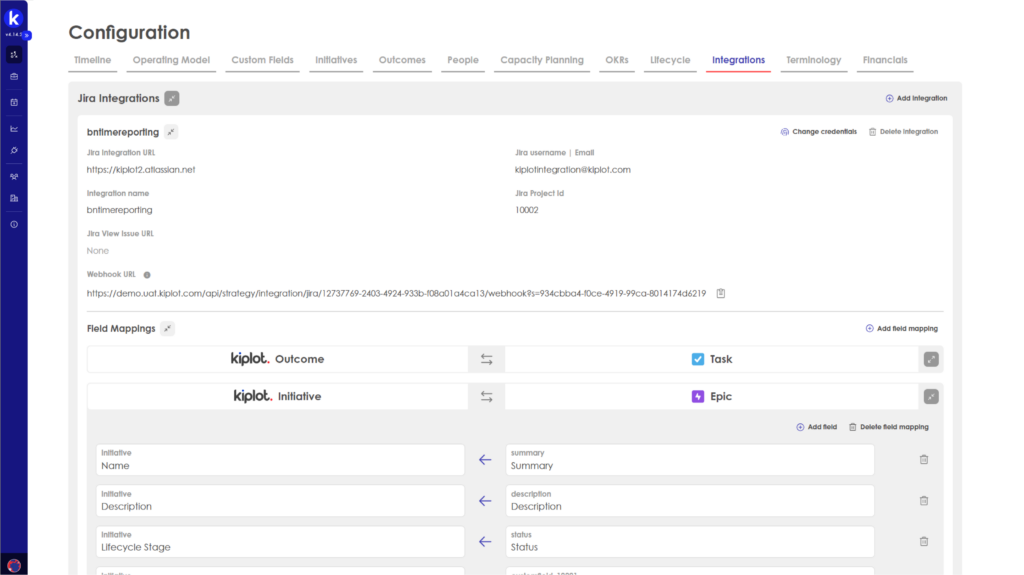
Field Mappings
Once you’ve set up a webhook for the project you’re integrating on, you’ll need to set up field mappings between the entity in Kiplot (e.g. initiaive) and entity in Jira (e.g. Epic).
Field mappings can be set to sync in three different directions:
- Write to Jira only = when a field is updated in Kiplot, the update will write to Jira and change the field. If I update a field in Jira, Kiplot will not read this change and the Kiplot field won’t update.
- Read from Jira only = when a field is updated in Jira, Kiplot will read the change and the field will update in Kiplot. If I update a field in Kiplot, the change will not write back to Jira and the Jira field won’t update.
- Write to and Read from Jira = Kiplot and Jira are fully in sync and when a field is updated in either platform, the change will be automatically reflected in the other.
It’s strongly recommended to set up all field mappings to Write to and Read from Jira. This will ensure that your data is always in sync between the two platforms.
Field mappings need to be set up separately for each entity within a Jira project and can be configured in Configuration > integrations.
- Open the project you want to add field mappings too
- Click ‘Add field mapping’
- Select the Kiplot entity and Jira entity that you want to map from the drop down lists.
- Click ‘Add field’.
- Enter the Kiplot field on the left and the Jira field that you want to map to on the Right.
- Ensure the arrow is displaying the correct sync direction. *Reminder, it’s strongly recommended to set all mappings up as Read and Write.
- Click on the blue save button.
As with webhooks, field mappings will only sync from the date that they were created.
Key Fields: Initiatives
These are the Key Fields which need to be set up on an Initiative in Jira for an effective Kiplot <> Jira integration.
| Kiplot field | Jira field | Notes |
|---|---|---|
| Name | Summary | The name of the Initiative. |
| Description | Description | The description of the Initiative. |
| Lifecycle Stage | Status | The workflow status of the Initiative. Note, we do not currently support a field mapping between workflow stages that have a pop up screen enabled. |
| Team | Team | The name of the Team assigned to the Initiative. There is an extra step required when setting this up Teams. Please see the Teams section below. |
| Overall RAG | RAG Status | The RAG status of the Initiative. |
| Start Date | Target Start | The start date of the Initiative. |
| End Date | Target End | The end date of the Initiative. |
| Type | E.g. Demand Type | This is the category of the Initiative. This field will enable you to use the Type lens/filter on the Initiative Roadmap. |
| Initiative URL | Kiplot Initiative Link | This creates a link in Jira that takes Users directly to the Initiative in Kiplot. This needs to be set up as a custom field with the type URL. This field should be set up as Write only to Jira. |
Key Fields: Outcomes
These are the Key Fields which need to be set up on an Outcome in Jira for an effective Kiplot <> Jira integration.
| Kiplot field | Jira field | Notes |
|---|---|---|
| Name | Summary | The name of the Outcome. |
| Description | Description | The description of the Outcome. |
| Delivery Status | Status | The workflow status of the Outcome. |
| Outcome Initiative | Parent Link | The link to the Initiative the Outcome belongs to. |
| Team | Team | The team assigned to the Outcome. There is an extra step required when setting up teams. Please see the Teams section below. |
| Overall RAG | RAG Status | The RAG status of the Outcome. |
| Start Date | Target Start | The start date of the Outcome. |
| End Date | Target End | The end date of the Outcome. |
| Outcome URL | Kiplot Outcome Link | This creates a link in Jira that takes Users directly to the Outcome in Kiplot. This needs to be set up as a custom field with the type URL. This field should be set up as Write only to Jira. |
Additional Fields
You can enhance your Kiplot <> Jira integration by integrating on additional fields. Below are some examples of fields our Customers have previously integrated on, but as long as you follow the guidance laid out further in this document, you should be able to map any field in Jira to a custom field in Kiplot.
| Kiplot field | Jira field | Notes |
|---|---|---|
| Owner | Owner | The owner of the Initiative / Outcome |
| Due Date | Due Date | The date the Initiative / Outcome is due. |
| Risk RAG | Risk Rag Status | The Risk Rag Status of the Initiative / Outcome. |
| Resource RAG | Resource RAG Status | The Resource Rag Status of the Initiative / Outcome. |
| Financial RAG | Financial RAG Status | The Financial Rag Status of the Initiative / Outcome. |
| Product | Product | The Product that the Initiative / Outcome is associated with |
| Client | Client | The Client that the Initiative / Outcome is associated with |
Field Mapping Guidance
In order for a Jira and Kiplot field to successfully sync, there are a few things to note:
- The fields you’re mapping must always have the same value ‘Type’. E.g. if a field in Kiplot is set up with the type ‘List (single select)’ the field in Jira must also be a single select field. Similarly a Date field in Kiplot must always map to a Date field in Jira. You can view the Type assigned to a field in Jira in the Kiplot Configuration.
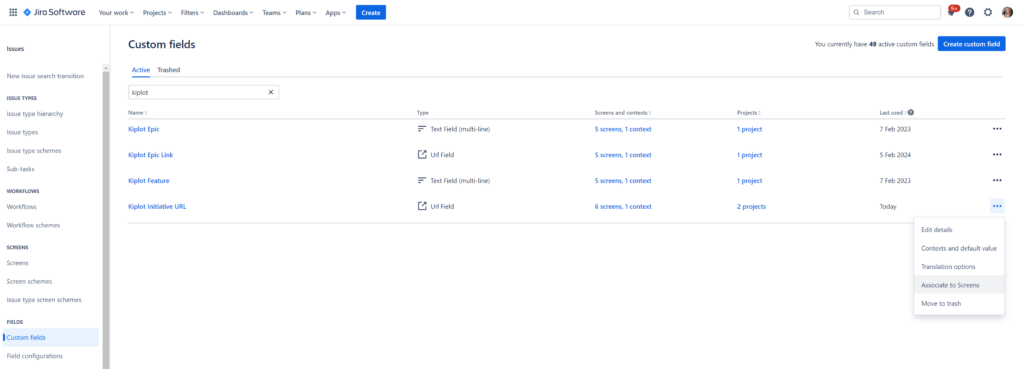
- The field you’re mapping to in Jira must be available on the appropriate Issue Screen, otherwise the Write Sync will fail. Jira admins can enable a field on an Issue Screen:
- Navigate to ‘Custom Fields’ in the settings for Jira (accessed by selecting Issues from the settings cog in the top right hand corner)
- Select the field that you’re mapping from the list of Custom Fields
- Click on the three dots to the far right of the field you’re mapping to and select ‘Associate to Screens’
- Ensure that the correct screen has the blue tick box checked – this will usually read ‘Project Default Issue Screen’, but may differ between organizations
- Click the update button on the bottom left of the page
Teams
In order to successfully map the Team field in Jira the Team needs to be manually created in both software and the Team name must be an exact match. Once you’ve added the team into Kiplot, the sync should take 5-15 seconds.
If you’re using Jira Cloud (Premium) there is a quirk with Jira teams which means there’s an additional step for setting up the mappings. This does not affect Jira Data Center.
When you add a new team in Jira, in order for it to be available for mapping in Kiplot, it needs to have been assigned to at least one issue in Jira (this is because it won’t return from the Jira API by default). As soon as the Team has shown up in Kiplot, you can remove the team from the issue in Jira, it’s just the initial assignment of the team which is required. This needs to happen for each Team.
